Wednesday, May 27, 2015

Make Your Own Tomato Sauce


There's a great song "Home Grown Tomatoes" By Guy Clark....
 And I totally agree! Funny enough; I don't really like to eat raw tomatoes. But I love me my tomato soup. With lots of crackers.

My sauce garden!
 And there's nothing in the world like a good old fashioned home grown tomato sauce!
Sauce in progress! My Mom's old kitchen; not a lot of space but we managed.

Great Tomato Sauce

8-10 nice juicy ripe Tomatoes - cored, chopped, ready to use OR 3 Large cans chopped tomatoes
Two large sweet onions  - Chopped
1 each Red and Green Pepper - Chopped
5 cloves Garlic - Minced
5 stalks Celery - Chopped
2 Shallots - Chopped
Peppercorns Crushed 2 Tsp
Salt  1 tsp or to taste
Brown Sugar 3 Tsp (to taste)
Italian seasoning 4 Tsp (to taste)
Dash Louisiana Hot Sauce
4-6 leaves fresh Basil leaves

In large deep frying pan,  preheat on med-high and cover bottom with olive oil. 
Continuing on med-high heat brown onions, garlic & shallots. 
Once caramelized add in the peppers and celery, reduce heat to medium.
About three minutes later, or when your peppers have turned 'bright', add in your tomatoes (canned or fresh.)

Add Salt, Pepper and Italian seasoning. Gently 'crush' tomatoes with a potato masher, stir all together. I would not recommend an inmmersion blender (unless you want this a puree) as the beauty is in the chunky sauce.

Cover and let simmer for half hour, stirring occasionally. Taste at the 30 minute mark, adjusting your spices. Add lid and on your lowest heat setting, simmer another hour.


I finish off my sauce with a couple of splashes of Louisiana Hot Sauce and serve with fresh basil.


What is your favourite pasta to top? Any recipe tips to share? Would love to share them!


Tuesday, May 19, 2015

Gardening!

It was our May long weekend - Victoria Day Long Weekend - or as well call it; May Two Four. I know I know. It wasn't on the 24th. Just, never mind.

Traditionally it's the time of year when the risk of frost has passed and we can put in our gardens.
Sit back and enjoy.


Getting some good supervision from Vamp

Dancing Bunnie Statue. My fav!

Teeny Tiny Sauce Garden


Number 25 and a Half.


Sunday, May 17, 2015

One Dish Saucy Chickin'


Y'all need your best Paula Deen southern drawl now....g'wan, trah iyit.....

This is the easiest, most crowd pleasin' dish you'll ever make. It's also a great weeknight idea if you've suddenly got company coming, or forgot to hit the shops on the way home 'cuz you've prob'ly got all these ingredients in your panty/fridge.


If you need to double the recipe, use two dishes; one for the taters and veggies, and one for the onions, garlic and chickin'.
( It's also a GREAT "first dinner" recipe cuz it's really, really, hard to mess up.)
This recipe is for two with leftovers for the next day.

There are hundreds of variations you can do, I'll put some at the bottom.

Ingredients:
5 or 6 big Potatoes - redskins or yellow flesh
2 small or 1 large Sweet Onions
7 garlic gloves, peeled
1 head of broccoli
3 boneless, skinless chicken breasts (butterfly them if they are whole)
1 bottle low fat Italian salad dressing
Drizzle of olive oil
Pepper, Granulated Garlic ,Italian Seasoning, water

Preheat oven to 400F. Wash potatoes, cut out yucky spots. Cut up into chunks.
Slice onion into 'rings, cut broccoli into florets, peel and slice garlic, or you can leave the cloves whole.
Tidy up chicken, (remove any gobs of fat) and butterfly.

In large glass baking dish, (the big one) drizzle olive oil to the bottom is nearly lightly coated. Add all ingredients but chicken breasts and broccoli, add pepper & granulated garlic liberally, stir all together in dish until lightly coated with the oil. Make a space in the middle of the dish for the chicken, place them in and drizzle lightly with oil, turn over to coat.


This was before I realized that you add your broccoli at the end. Otherwise, it's mush.

When all is in dish, take your dressing and liberally dump it on. Don't be shy now.
Use almost a quarter of the bottle, stir all in dish to ensure coverage.
Add enough water to cover the bottom of the dish, about 1/2 inch - one cm.

Place in oven, and check at 20 mins, and give it a stir.
 At 40 minutes, remove and stir, flip chicken, add another quarter of a bottle of dressing. 
Stir all and ADD BROCCOLI,  replace in oven, check tenderness of taters.

 Cook for another ten minutes and check doneness. Use your judgement on how soft you like your taters.

 Keep an eye on the level of the water and dressing, if you need more, add more.

NOTE: I did not add ANY salt to this recipe. I advise you not to either, the dressing covers most of the spices.


**Variations**

Don't like the salad dressing?
 Use olive oil to coat your ingredients, add a bit of OJ and water to the bottom of the pan.
Add garlic powder, chili powder and salt and pepper to taste.

Add strips of bacon overtop of the chicken breast, omit the Italian dressing. Stir in some ranch dressing at the 30 mins mark to make it creamier. You might want to reduce heat to 350 as the ranch will burn.

More ideas? Add in strips of peppers; green, red, orange, etc. Or go crazy.... try asparagus, or brussels sprouts!

Saturday, May 16, 2015

Baked Maple Donuts with Maple Glaze

............I have a serious confession here folks.
This might get me in trouble with a lot of people.
It definately pushes me down the "How Canadian Are YOU" list.


Here it is.
*deep breath*


THERE. I said it. (waiting for lightning to strike me down)

No? Okay. I do admit I like Maple Syrup. The real deal though not that 'maple flavouring' stuff. But in general, I don't like maple donuts, maple coffee flavour, or maple candies, etc etc.

So when I was asked if I could do a special batch of Mother's Day donuts that were maple flavoured, I cringed. That meant taste testing. 
My kitchen was awash in donuts. Not a bad thing to be awash in, really.

So I went to a few tried and true sources and read a dozen or so recipes. I knew I wanted a moist cake donut that could hold the glaze well and be a bastion of mapley-goodness.
I tried some and they were more of a vanilla-cake tasting donut, and others were too cinnamony. (Yes, that's a word.  Or at least, it is now!) I tried buttermilk recipes and yogurt recipes, oil recipes and butter recipes. Most recipes got the maple taste from the glaze. But I wanted more. Oh yes.
 I realized to get the oomph and fullness of rich maple I wanted; I needed to take this one step further.
Then;  inspiration struck
 May I present:


Prep Time: 10 mins  Cooking Time: 8- 10 mins

Preheat the oven to 400 degrees 

Donut Ingredients:

1 cup all-purpose flour 
3/4 teaspoon baking powder
3/4 teaspoon baking soda
Pinch of Sale
1 Large egg (lightly beaten)
1 6 oz container (3/4 Cup) Maple Flavoured Yogurt
1 tablespoon canola oil
2 teaspoons lemon juice
3 tablespoons real maple syrup
1 Teaspoon Maple Syrup extract


Donut Glaze Ingredients:

1/4 cup Salted butter - best to cut through all the sweetness
1/2 cup pure maple syrup
1 cup Icing Sugar
1 teaspoon maple extract
For the Donuts:

 In a large mixing bowl; add all the dry ingredients and whisk together.
In a separate bowl, whisk together oil, lemon juice, maple syrup, maple extract and the egg.

Fold the wet into the dry and stir just until well mixed. Do not overmix.
Spoon the mix into a large ziploc bag, and snip one end corner off; about 1 inch.*

Pipe the batter into your prepared donut pan, about 2/3 full in each spot. Place into oven.
Set your timer for 8 mins; and check the donuts. If they still 'dent' and look moist when you touch them gently; do 1 minute increments until they are firmed up.

Cool for one minute and then flip the pan over and the donuts should fall out onto the cooling rack.
Let cool completely before glazing.

Donut Glaze:

In a small saucepan; over medium high heat:
Combine maple syrup with butter and let melt. Do not let it boil!
Once butter is completely melted; quickly whisk in the maple extract and the icing sugar.
Blend well and remove from heat. Let cool down slightly before using. And of course; don't forget to lick the spoon. :)

 To glaze the donuts:

Place some wax paper or parchment paper down under your cooling racks. Working quickly; dunk those donuts into the glaze.  I like to use the 'bottom' side of the donut so they look uniform, but that's up to you. Let the donuts sit with the glaze on them and after you've done them all, DUNK em again. Oh yeah. Double dunkers, baby.

(I found that placing the donuts in the fridge until ready to eat kept them nice and the glaze from melting. It got pretty humid here last week so right up until I served them we kept 'em in the fridge. You judge what's best for your donuts. )

Tips & Tricks:

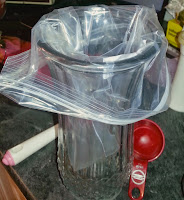
 * The easiest method to pipe your batter: Have a wide mouthed flower vase or other large jug ready. 
Place your ziploc bag into the vase/jar and drape the opening around the mouth of the vase. Spoon your batter into the vase, and voila.
Pull it out by the top and cut your opening; about one inch using the corner of the bag. 
Pipe your donuts into the pan; about just over half way (two thirds) full.


Friday, May 8, 2015

Catching Up with Photos

I

Yep so here it is May. 
And I barely wrote a word last month.
Well that's not entirely true.
I started teaching again and that meant two adjusted scripts to write, and I'm working on a new Murder Mystery for THIS:Murder on the Train . AND...we had a new addition to our family and she needed a lot of loving care. 
I also got very, very sick; some sort of bronchial thang that really knocked me out.
And sometimes....I don't know about you...but sometimes, I just don't have *it* to write. Ya know?
And then, it was so long since I'd blogged - I was a bit overwhelmed, like, where to start...!?!?

So... A Picture is worth a Thousand Words so.....here we go.
 Mr J was feeding a feral cat colony all winter. We managed to trap most of them.
This is a VERY pregnant Jumper.
Two days after succesfully trapping her; FOUR babies!

This is Zazi. We were fostering her, socializing her, so she'd be ready to be adopted.

She was so very tiny. She's about 6 months old.

Three weeks of playing, and reassuring her in the bathroom.

There was much playing of string. She was my total focus; and Mr. J was a saint for dealing with a messy house!

Wasn't too sure about the RC mouse.

In just a month and a half with us; she's grown twice her size and has completely taken over our house.

A new addition meant trips to the vet for all. Vamp and Mikie were not impressed.
 They got over it. Laugh.
 A surprise snowstorm in April, and NEW patio sliding doors!
Some outdoor fabric options

April 10th is my birthday, and I made cake!


Celebrating with my FAV sparkling wine. "Sofia". Yummmmmmmmmmmmmy.

And there was Cherry Coke and Ketchup Chips!

Mr. J gave my a wonderful present...the Ninja blender I've ben coveting for months!

It's getting a lot of use.
Starting cleaning up, really cleaning out my sewing space. Some vintage stuff to go on my Etsy shop.

Working on some childrens' costumes for my Etsy shop.

Getting the garden ready; and we needed some birdhouses!

FINALLY made one of my Mary Maxim cowl patterns. Love how it turned out.

Couldn't find a dress I liked in stores anywhere. Decided to design and make my own!

Pattern drafting

Fabric thoughts

Muslin pattern mock up

First fitting of dress!
I was laid low with a serious bronchial chesty thing. So I cleaned the sewing room.

Really cleaned. Oops! Looks like I left Muffin plugged in. LOL

All the fabric sorted by colour and notions all neatly stashed.

It started to get warmer!

The back shade garden started coming alive.

The front yard has some serious damage from salting the sidewalks. But the new tulips came up!

Birdhouses are out!
Visiting with my Mom !

Had a fun girls' night doing the Paint Nite thing.

I did this! And it was so easy!

There were lots and lots of donuts for Mother's Day weekend
......................and.....I'm planning my WEDDING!!!! WOOT!Less than six months!


So there's that. Lots went on.
And I'm back to sewing and making messess; I'll keep updating more often, I promise!!!!